About This Project

A 30–90 minutes craft for ages 5–12, using supplies you likely already have — Sprinkles, Candy Eyes, and Candy Melts.

GlueStick supports kids from setup to cleanup. After they choose a project, we guide them through gathering the supplies, making it, and cleaning up when they're done. We'll even help them share it safely with trusted family and friends.

Ad-free and kid-safe library — designed by a mom who wants kids to explore and create independently.

This project is perfect for:
Project Tags
  1. 1

    Find Supplies

    Do you have everything you need?
    Create a free GlueStick account to track supplies and see if you have what you need at a glance. Leave your kids tips about where supplies are stored in your household so they can set up and clean up their creative spaces independently.
    00:00
    A cartoon of Sprinkles
    Unknown cupboard quantity You have: unknown
    Allergen
    A cartoon of Candy Eyes
    Unknown cupboard quantity You have: unknown
    A cartoon of Candy Melts
    Unknown cupboard quantity You have: unknown
    Allergen
    A cartoon of Candy Melts
    Unknown cupboard quantity You have: unknown
    Allergen
    A cartoon of Pastry or Piping Bags
    Unknown cupboard quantity You have: unknown
    A cartoon of Candy molds
    Unknown cupboard quantity You have: unknown
    A cartoon of Spoons
    Unknown cupboard quantity You have: unknown
    A cartoon of Storage Containers
    Unknown cupboard quantity You have: unknown
    A cartoon of Candy
    Unknown cupboard quantity You have: unknown
    Allergen
    A cartoon of Mixing Bowls
    Unknown cupboard quantity You have: unknown
    A cartoon of Cookies
    Unknown cupboard quantity You have: unknown
    Allergen
    A cartoon of Sandwich Cookies
    Unknown cupboard quantity You have: unknown
  2. 2

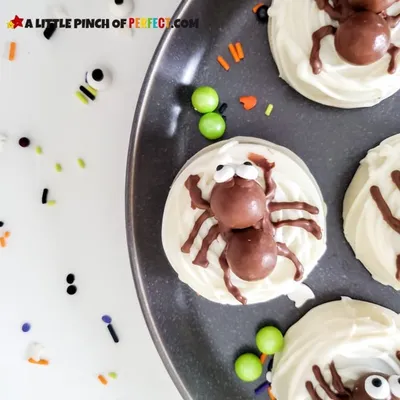
    Make Oreo Spider Cookies

    Your creative buddy says:
    "Are you as excited to make this as I am?"

    Heads up! Some supplies may trigger allergies. Check with a grown-up before using them.

    Step 1: Melt white candy melts.

    HOT! Grown-up required
    Ask a grown-up to help you melt the white candy melts. Put them in a microwave-safe bowl. Heat them in the microwave for 30 seconds, then stir. Keep doing this until the candy is smooth. Make sure no water gets into the candy melts.

    Step 2: Cover Oreos with white candy (optional).

    This step is optional. If you want to make your cookies extra fancy, ask a grown-up to help you with this part. Fill an Oreo candy mold one-quarter full with melted white candy. Place one Oreo in the middle. Gently press it down, but not all the way to the bottom. Spread more white candy on top of the Oreo until the mold is full. Do this for all your cookies. Let them sit for about an hour to get hard. You can put them in the fridge to make them harden faster. If an Oreo touches the bottom of the mold, take it out and try again. Once the candy is hard, carefully take the cookies out of the mold.

    Step 3: Draw spider webs on the cookies.

    Melt some white candy melts and put them into a piping bag. Draw spider web patterns on your cookies. You can make a classic web with lines going out and a swirl, or just a simple swirl.

    Step 4: Add the spider's body.

    Take two malted milk balls and place them close together on top of each cookie. These will be the spider's body.

    Step 5: Prepare chocolate for spider legs.

    Ask a grown-up to help you melt the chocolate candy melts. Put the melted chocolate into a piping bag. If the chocolate gets too hard, ask a grown-up to help you warm it up again.

    Step 6: Draw spider legs and finish body.

    Use the piping bag with chocolate to draw four spider legs on each side of the malted milk balls. Also, pipe some chocolate in the space between the two milk balls to make the spider's body look complete.

    Step 7: Give your spiders eyes.

    Put two small dots of chocolate on the front of the spider's head. Gently press two candy eyeballs onto these chocolate dots.

    Step 8: Store your cookies and serve them.

    Keep your finished spider cookies in a container that closes tightly until you are ready to eat them. For extra fun, you can put festive Halloween sprinkles around your cookies when you serve them!
  3. 3

    Clean up

    Put things away so your space is tidy for next time.

    Reminder, this project used supplies that may trigger allergies. Store them safely!

    Tidy up our space

    Put away our supplies

    Check off each supply when it is put away — and any clean-up tips underneath are done too. You might find a fun surprise!

    • A cartoon of Sprinkles
      Where they belong:
      • — Don't forget! Make sure any lids on your sprinkles are closed tightly.
    • A cartoon of Candy Eyes
      Where they belong:
    • A cartoon of Candy Melts
      Where they belong:
      • — Don't forget! Allow unused candy melts to cool, then store for another time or scrape it into the trash. Do not dispose of unused candy melt down the sink or you could clog the drain.
    • A cartoon of Candy Melts
      Where they belong:
      • — Don't forget! Allow unused candy melts to cool, then store for another time or scrape it into the trash. Do not dispose of unused candy melt down the sink or you could clog the drain.
    • A cartoon of Pastry or Piping Bags
      Where they belong:
      • — Don't forget! Remove the tip from your piping bag
    • A cartoon of Storage Containers
      Where they belong:
    • A cartoon of Candy
      Where they belong:
      • — Don't forget! Make sure any unused candy is sealed before putting it away.
    • A cartoon of Cookies
      Where they belong:
    • A cartoon of Sandwich Cookies
      Where they belong:
      • — Don't forget! Seal up the package of sandwich cookies so they don't go stale.
    • A cartoon of Candy molds
      Where they belong:
      • — Don't forget! Wash your candy molds with warm water.
    • A cartoon of Spoons
      Where they belong:
    • A cartoon of Mixing Bowls
      Where they belong:

    Update what we have left

    Did we run out of anything while making this project? Update our supply cupboard so that we know exactly what we have for next time.

    This project could unlock 3 creative buddies. Sign in to unlock them.

  4. 4

    Save

    Your creative buddy says:
    "Great job!"

    Create a free account to save your digital masterpiece to the Art Gallery.

Use what’s already at home

Snap a junk-drawer photo and GlueStick finds projects you can start in minutes — no store trip, less expense, more creative afternoons.

+ 350 more
Supply Snap

About the Author