Folded Paper Morpho Butterfly

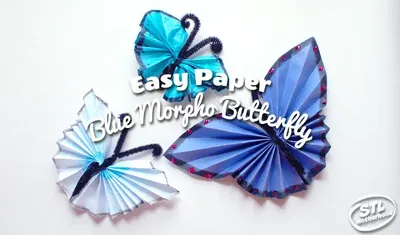
Folded Paper Morpho Butterfly - Easy Nature Craft for Kids

5-10 minutes
Ages 5-10
2
steps may need help

About This Project

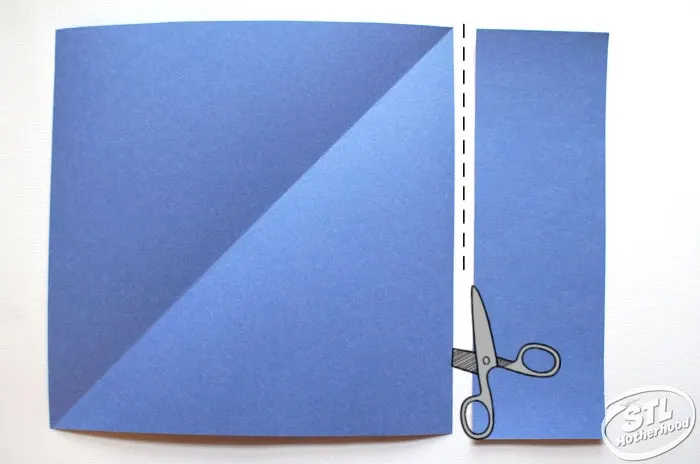
Brighten your day with these beautiful paper Blue Morpho Butterflies! They're super easy to make with common crafty items like paper, crayons, markers, and pipe cleaners. You can make this butterfly with just about anything: plain white paper, colorful construction paper, or tissue paper. While the directions show you how to make your butterfly look like a blue morpho, you can use any color you like—there's a lot of butterflies in the world to inspire your creativity!

This project is perfect for:
  • Nature Craft Projects
  • Spring Activities
  • Butterfly Studies
  • Paper Folding Crafts
  • Easy Kids Projects
Butterfly Blue Morpho Insects Paper craft Accordion Fold Zoo Garden Rainforest nature craft STEAM indoor Solo project Group project Fine motor skills Spring Summer Animals symmetry

Steps

A photo showing how to complete this step

Cut your paper into a square

The easiest way to cut a rectangular piece of paper into a square is to fold one corner down until it meets the other side. Then, trim off the extra.

A photo showing how to complete this step

Cut into rectangles

Cut the square into two rectangles. One will become your top wings. The second will be the bottom.

A photo showing how to complete this step

Fold the bottom wings

Take one rectangle and accordian fold it from the short side like the piece on the right. This will become your bottom wings.

A photo showing how to complete this step

Make the top wings

To make the top wings, fold the second strip in half lengthwise (see the left image) and open back up. Fold the corners to the center fold (like you're making a paper airplane). Cut off the corners. Next fold it like an accordion along the long edge--use the same size folds as the other strip.

A photo showing how to complete this step

Color your wings

Open your strips of paper and flatten them out. If you're using white paper, use crayons or markers to make the butterfly blue and add a black stripe along the edges as shown. Tissue paper and construction paper butterflies just need the black stripe. Bonus: add red dots along the stripe with glitter glue! If you use glue, you'll need to give the paper time to dry before moving on the next step.

A photo showing how to complete this step

Assemble your butterfly

Cut the pipecleaner in half. Fold the butterfly back up along the creases you made. Fold each strip in half. Place the two folded parts of the butterfly together as shown. Wrap one half of the pipe cleaner around the two wing pieces. This will make the butterfly body.

A photo showing how to complete this step

Add the antennae

Take the second half of the pipe cleaner and slip it under the loop of the first half. Bend in half and twist a couple times to secure. Curl the ends into a loop--this is the butterflies antenna.

A screenshot showing the science lab in GlueStick
GlueStick Mascot

Ready to start your kids' creative journey?

Sign in or Join GlueStick to

  • View step-by-step, ad-free instructions for this project and many more
  • Snap a photo of your family's favorite supplies to search for other projects you can do right now
  • Share family masterpieces in our Art Gallery
  • Inspire kids from set-up to clean-up with supply scavenger hunts and unlockable avatars

About the Author

STL Motherhood

I’m a boy mom, crafter and former reporter who loves taking my kids to superhero movies. Join me for a mix of traditional kid crafts, STEM fun and 3D printing.

View more by this author

GlueStick's projects are created by our community of paid Activity Authors. Are you a creative grown-up with a passion for inspiring kids? Learn more and apply to join our author community.

Learn More